Xyicon Users
Use this article to view and update boundaries in the BOUNDARIES module.
Before you begin
- Make sure you have added boundaries to your space.
- Verify that your Xyicon User has the necessary permissions to view and update boundaries. User Permissions are managed by your organization's Xyicon Administrator.
Viewing a Boundary
- Go to Main Menu > BOUNDARIES. A list of boundaries will be displayed for the module.
- To switch views, click the View Selector field on the Views Bar and select an existing view. If your view is pinned to the navigator, you can access it directly. Go to Main Menu > BOUNDARIES > View Name. You can also create your own view.
- Select a boundary from the table to see related details on the Side Panel > Details tab ( ).
- To view a boundary on the Space Editor, hover over the boundary record on the table, and click the Open in Space Editor button ( ) displayed to the left.
Updating Boundary Details
Update a Single Boundary
- On the BOUNDARIES module, select the boundary you want to update. TIP: To refine the list of boundaries in the current view, use the Quick Find field on the Action Bar or the Side Panel >Filter tab ( ).
- Click the Side Panel > Details tab ( ) to see the available fields. Use the Splitter to resize the Side Panel to your liking.
- Add, delete, or edit the values in the respective fields.
- Select the checkmark ( ) next to the field to save the changes. Alternatively, you can also press the Enter key, for text and numerical field types, to save the changes.
Update Multiple Boundaries
- On the BOUNDARIES module, select the checkboxes against the boundaries you want to update. To update all records, select the checkbox on the table header.
- Next, click the field you want to edit on the Side Panel > Details tab ( ). The field will expand to show two additional fields.
- Select the values you want to change in the Value(s) to Update field using the options below:
- (All Values) - Replace all existing and blank values for the selected records with the new value.
- (Blank Values) - Update records that only have blank values.
- <Specific Value> - Update records with a specific value.
- In the New Value field, enter or select the value that will replace the value in Step 3. If you want to remove the old values, leave this field empty.
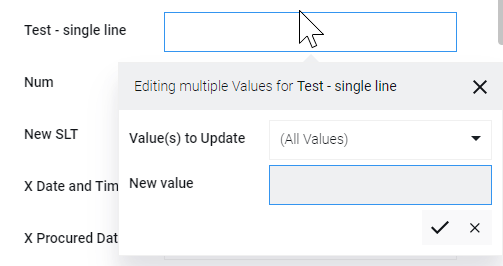
- Select the checkmark ( ) or hit the "Enter" key and the Confirm Update alert box is displayed to confirm the changes. If you want to discard the changes, select the cross ( x ) or hit the "ESC" key.
- In the Confirm Update alert box, select Yes or hit the "Enter" key to confirm changes. Select No or hit the "ESC" key to not go ahead with the changes.
- Repeat steps 2 to 6 as required.