Use this article to learn how to import updates in bulk to the Catalog module window using a Microsoft Excel or CSV file.
Importing catalog item updates in Xyicon lets you update multiple catalog items in bulk. This feature helps maintain accurate catalog information while saving time and minimizing manual errors.
Before you begin
Xyicon Requirements for Import
- Make sure you have set up the following module settings for the Catalog module under Settings ( ): Catalog Types, Catalog Fields, and Catalog Layouts.
- Verify that your Xyicon User, has the necessary permissions to update catalog items.
Module settings and user permissions are managed by your organization's Xyicon Administrator.
Excel/CSV File Requirements for Import
All files used for import must:
- Be a
*.csvor*.xlsxformat. - Contain changes related to the Xyicon organization at the time of importing.
- Have a header row with column headings. Xyicon considers the first row as the header row. If the first row contains values instead of column names, the values will not be imported.
- Contain a column with the catalog IDs.
- Only include the columns whose data you want to change to avoid accidental data changes.
- Be smaller than 5 MB in size and contain less than 10,000 rows per single import.
- Ideally, have only one sheet. If your file has more than one sheet, Xyicon will only import the data on the first sheet.
Step 1 - Upload File
- Navigate to the Catalog module from the Main Menu ( ).
- Click the Import button ( ) on the Action Bar. The Import Updates from Excel panel will open with the scope preset to the Xyicon Organization since catalog item imports are for the entire organization.
- Next, drag and drop your Excel file (
*.csvor*.xlsx) into the Upload File box ( ) or click anywhere inside the box to browse your documents and select your file. - If the upload is successful, you will see the file at the bottom of the panel.
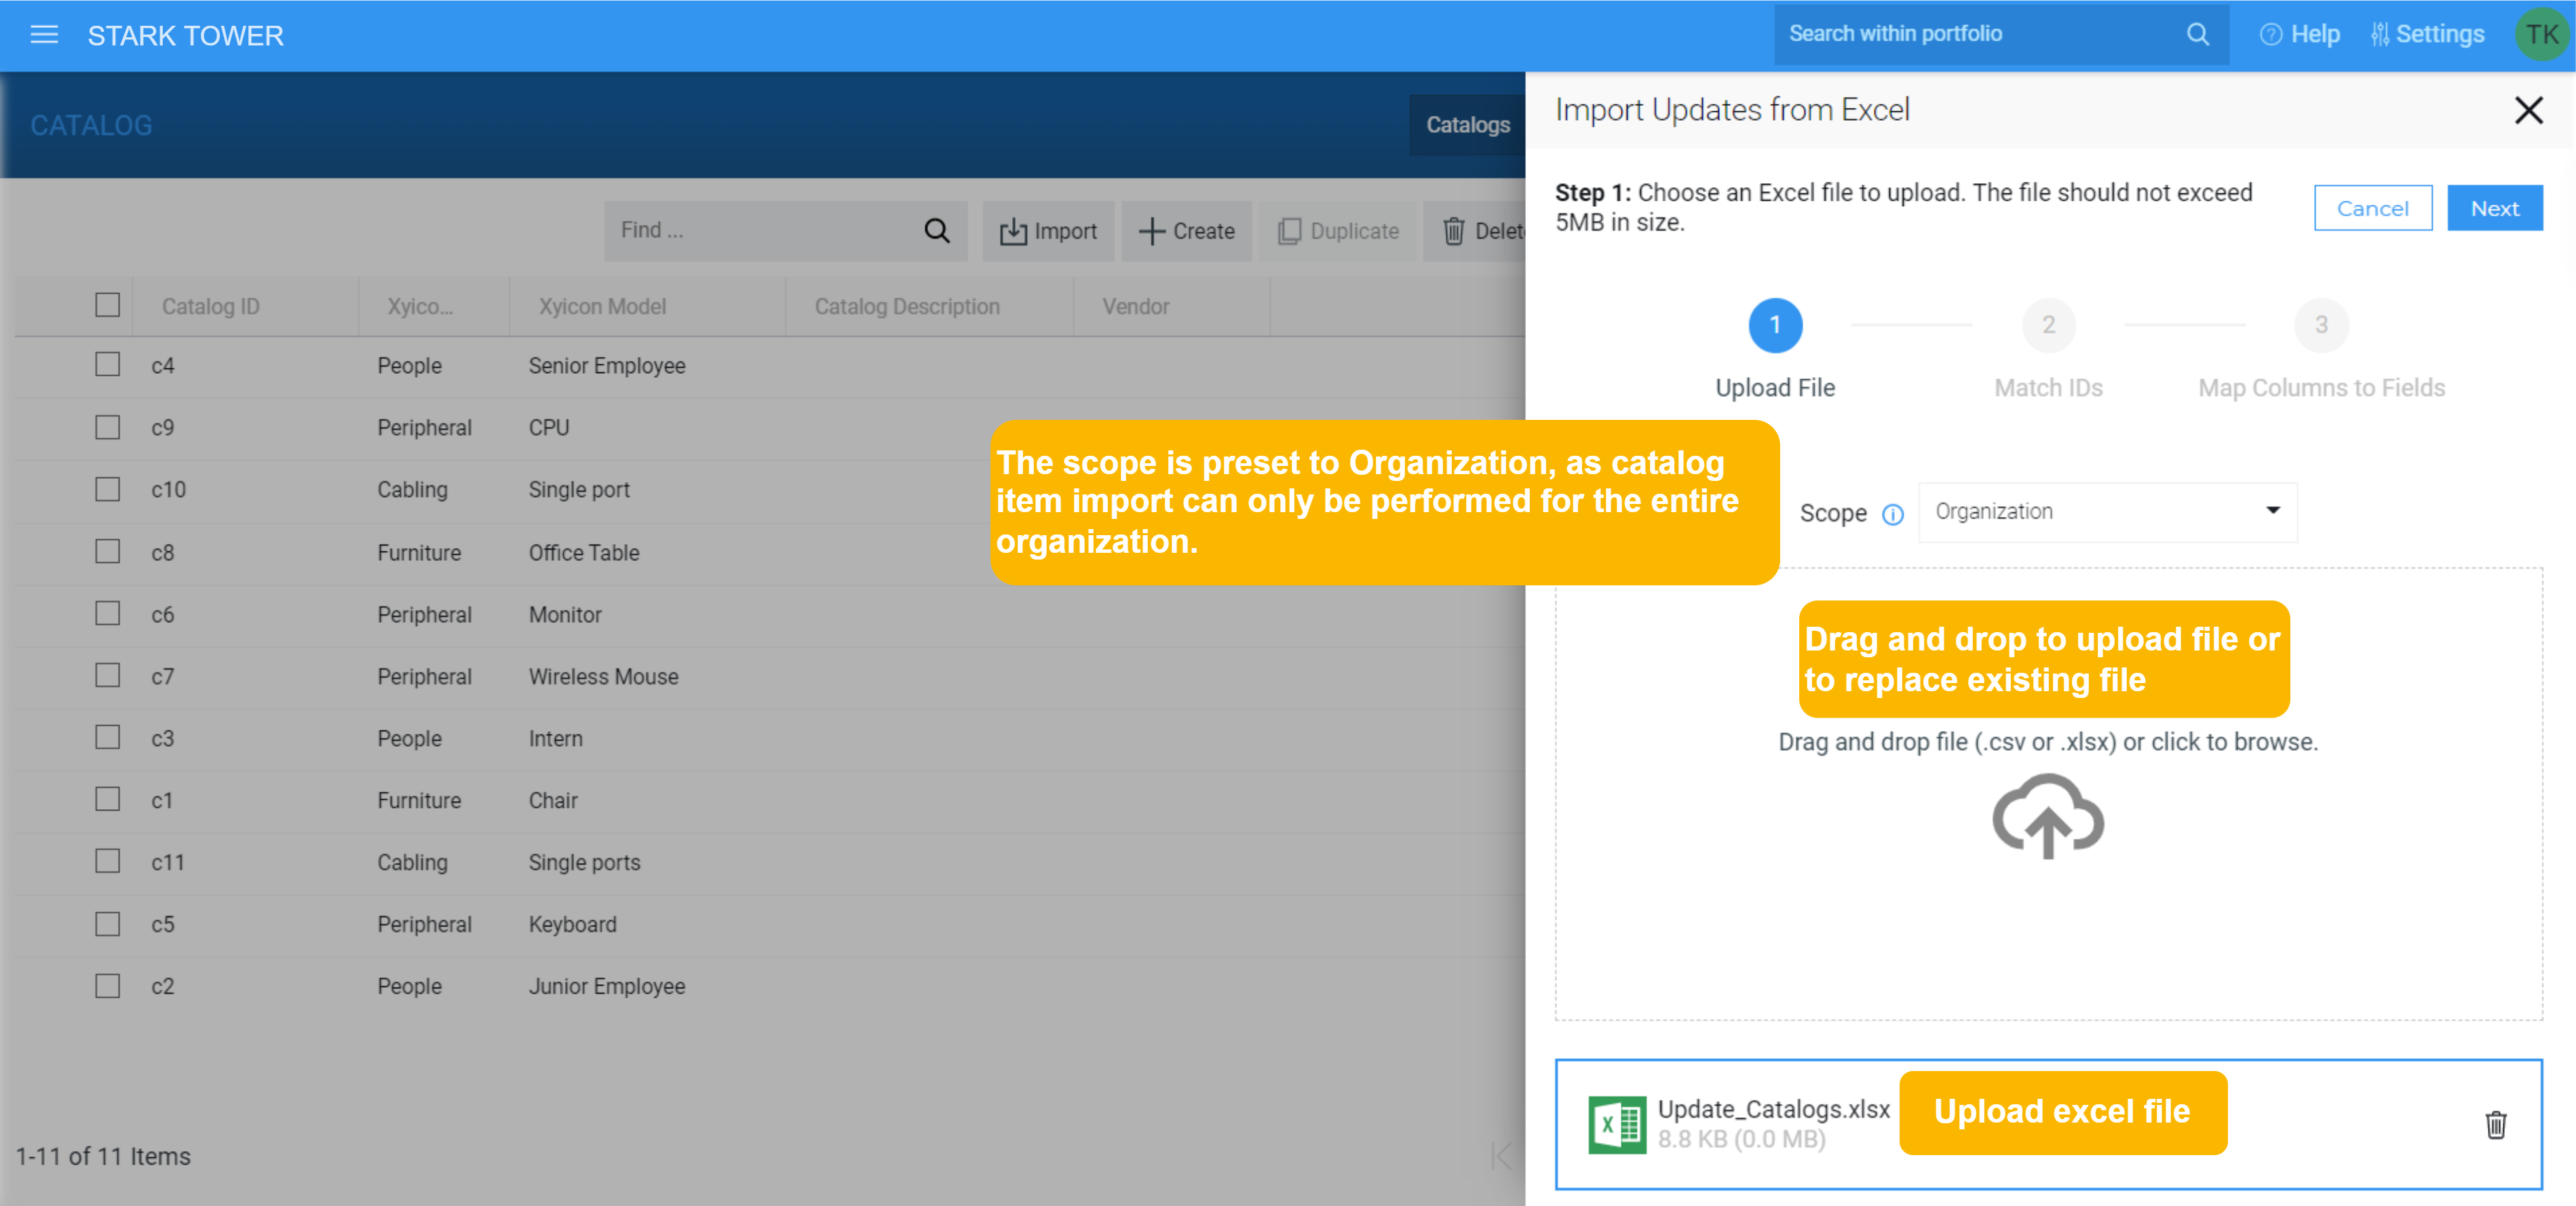
- To replace the uploaded file with a new file, repeat step 3. The uploaded file at the bottom will be replaced automatically with the new file.
- Once you have successfully uploaded your Excel file, click Next.
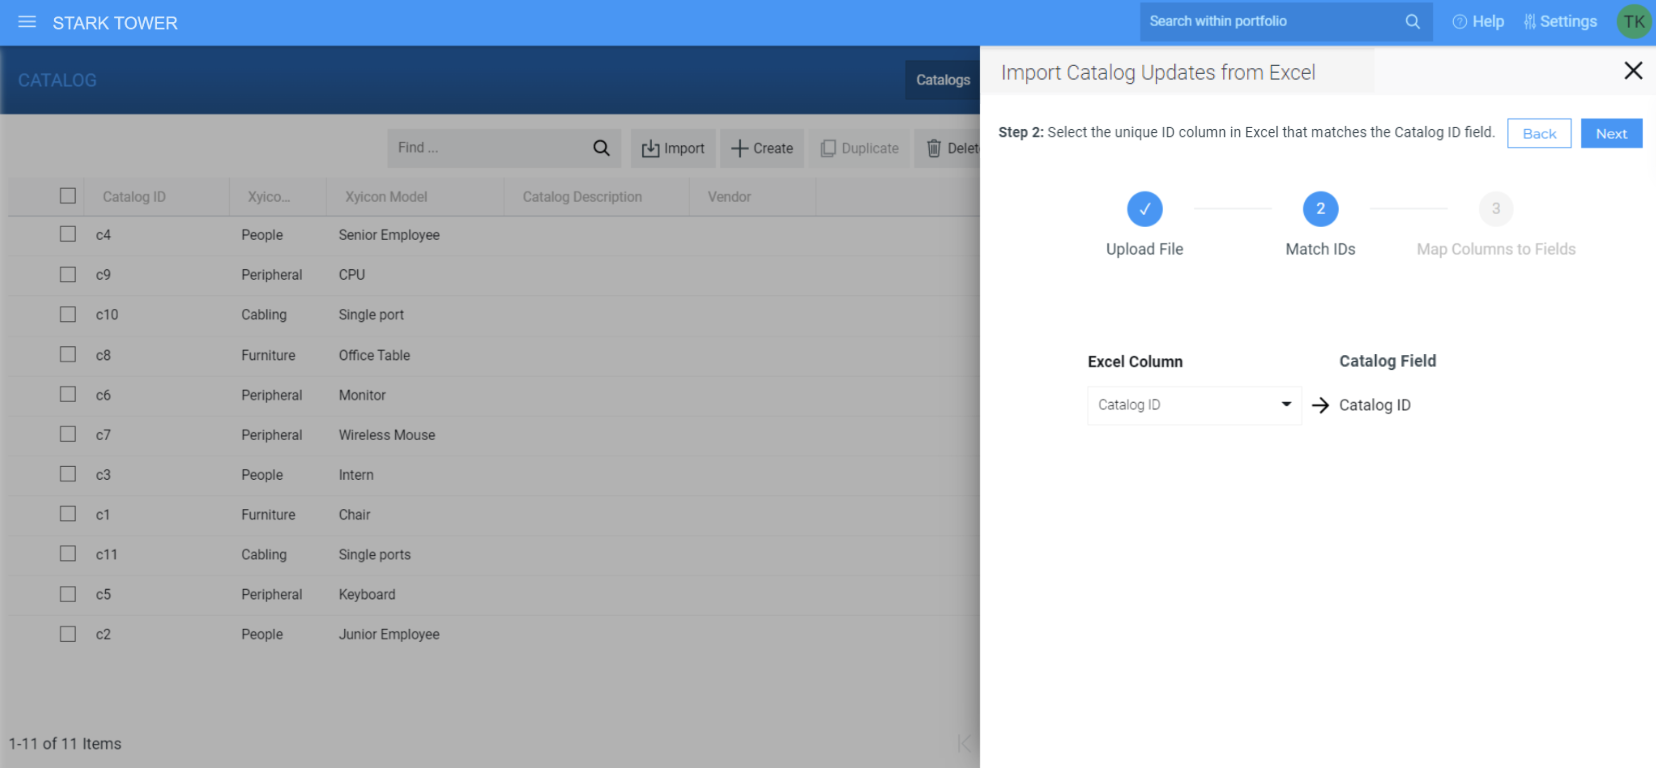
Step 2 - Match IDs
In this step, you will select the Excel Column that corresponds to the Catalog ID field in Xyicon, so the application can determine which catalog items to update. Make sure the Excel column you select corresponds to the Catalog ID field in Xyicon.
- On the Import Updates from Excel, Match IDs step, select the Excel column name from the Excel Column dropdown that matches the Catalog ID field shown under the Xyicon Catalog Field.TIP: If your Excel column header is named Catalog ID or ID, Xyicon will automatically select the column and display it in the dropdown.
- Click Next to map the rest of the catalog item fields to Excel columns.
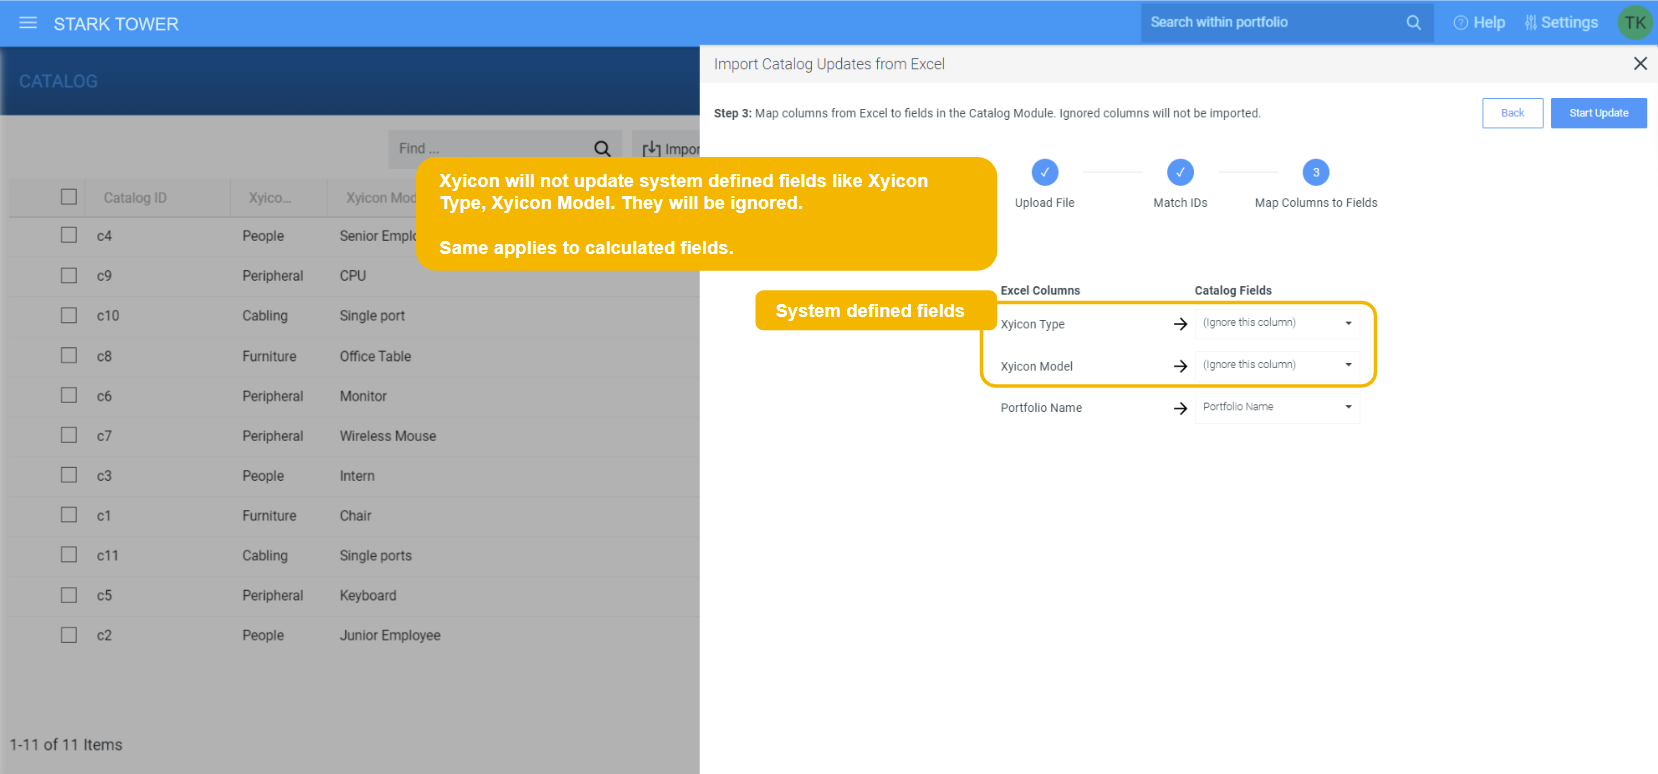
Step 3 - Map Columns to Fields
Xyicon will attempt to automatically map fields to the Excel Column by matching the field and column names. Xyicon will set the mapping to (ignore this column) where the field and column names differ. Calculated fields and system-defined fields (Xyicon Type, Xyicon Model, Last Modified At) will be ignored by default since they are predefined fields.
- On the Import Updates from Excel, Map Columns to Fields step, select the correct catalog field from the respective dropdowns under Xyicon Catalog Fields for each Excel column.TIP: You must map at least one column to a field to import your changes.
- Select the default value (Ignore this column) if you do not want to import an update to a particular field.
- Once you have completed mapping fields between Excel and Xyicon, you are ready to import your updates.
Step 4 - Import your Updates
Click Start Update to import your updates. The import process may take a few minutes based on the number of records and updates per record. During this time, you will see one or more of the following alerts indicating the progress of your Import.
Alerts during the Import Process
Import Status Alerts
- Import completed successfully without any errors.
.png)
- Import was partially successful. Click the Download Error Report button to see a list of records with errors, including the cause of the errors.

- Import completed without updating a single record. Click the Download Error Report button to see a list of records with errors, including the cause of the errors.

Import Progress
Import consists of a large number of records and is updated in batches.