Xyicon Users
Use this article to learn how to manipulate boundaries that exist in your space. To learn how to add a boundary and update its details read the Adding Boundaries to your Space and Updating and Deleting Boundaries articles.
Before you begin
Ensure that your Xyicon User has the necessary permissions to view and update boundaries. User Permissions are managed by your organization's Xyicon Administrator.
Selecting a Boundary
- Open your space in the Space Editor.
- Locate the boundary on the space background by using the Pan Tool ( ) on the Space Editor Toolbar. Alternatively, click the Side Panel > Boundaries tab ( ), and click a row to zoom in to the boundary on the space background.
- To select the boundary, place the cursor towards the boundary's edge until the cursor turns into a hand pointer and the boundary changes color.
- Click to select.
- To select multiple boundaries, press and hold the Ctrl/Cmd key and repeat steps 2, 3, and 4.
Resizing and Reshaping a Boundary
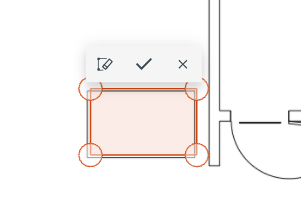
- Select the boundary.
- Click the Edit button ( ) on the Action Bar for the boundary. You will enter the edit mode, denoted by the anchor points located on the boundary's corners.
- After completing the updates, you can proceed by clicking on the following Action Bar buttons.
- Redraw - Allows you to keep the boundary details and redraw the boundary from scratch.
- Done ( ) - Save the changes made to the boundary.
- Cancel ( ) - Revert any changes made to the boundary.
- To resize the boundary, press and hold the Ctrl/Cmd key on your keyboard, click on a polyline, and drag it in the desired direction.
- To change the boundary's shape, click on an anchor point, and drag it in the desired direction.
- To add new anchor points, click anywhere on one of the boundary lines where you want the new point to appear. Repeat as necessary.
- To move an anchor point, click and drag the anchor point to anywhere on the space.
- To delete an anchor point, click and drag the anchor point to one of the points on either side of it, or select an anchor point and press the Delete key on your keyboard.
- To save your changes, click the Save button ( ) on the Edit Toolbar, or click anywhere within the space editor, avoiding the boundary line.
Moving a Boundary
- Place the cursor towards the boundary's edge until the cursor turns into a hand pointer and the boundary changes color.
- Click and drag the boundary to the new location.
- Align the boundary correctly with the background and release the mouse button.
NOTE: If a boundary type is locked in Layers, the boundaries of that type will not be movable.
Rotating a Boundary
- Select the boundary.
- Click the Rotate button ( ) on the Action Bar for the boundary.
- Grab the rotation handle, rotate the boundary to the desired angle, and then release the handle once it is in the desired position.