Xyicon Users
Use this article to learn how to update a boundary's details and delete a boundary inside Space Editor.
Before you begin
- Make sure module settings such as Boundary Fields and Boundary Layouts are defined for the Boundary module.
- Verify your Xyicon User has the necessary permissions to update and delete boundaries.
Module Settings and User Permissions are managed by your organization's Xyicon Administrator.
Updating Boundary Details
Select a Boundary
- Open your space in the Space Editor.
- Locate the boundary on the space background by using the Pan Tool ( ) from the Space Editor Toolbar. Alternatively, click the Side Panel > Boundaries tab ( ), and click a row to zoom in on the boundary in the background.
- To select the boundary, move the cursor towards the boundary's edge until the cursor turns into a hand pointer and the boundary changes color.
- Click to select.
- To select multiple boundaries, press and hold the Ctrl/Cmd key and repeat steps 1, 2, and 3.
Update a Single Boundary
- Select the boundary you want to update.
- Click the Side Panel > Details tab to see the available fields for the selected boundary. Use the Splitter to resize the Side Panel to your liking.
- Add, delete, or edit the values in the respective fields.
- Select the checkmark ( ) next to the field to save the changes. Alternatively, you can also press the Tab key or Enter key to do the same.
Update Multiple Boundaries
- Select the boundaries you want to update.
- Next, click the field you want to edit on the Side Panel > Details tab ( ). The field will pop out in a new dialog box to show the following additional fields.
- Value(s) to Update - Specify the values that need updating.
- New value - Enter the value that will replace the existing value.
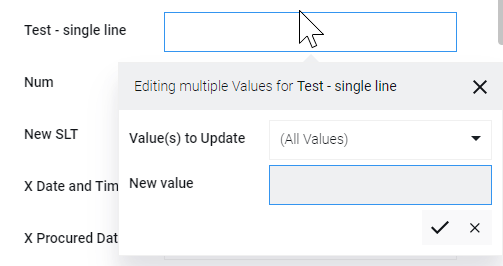
- Value(s) to Update - Specify the values that need updating.
- Select the values you want to change in the Value(s) to Update field using the options below:
- (All Values) - Replace all existing and blank values for the selected records with the new value.
- (Blank Values) - Update records that only have blank values.
- <Specific Value> - Update records with a specific value.
- In the New Value field, enter or select the value that will replace the value in step 3. If you want to remove the old values, leave this field empty.
- Select the checkmark ( ) or hit the Enter key to proceed with the changes. If you want to discard the changes, select the cross ( x ) or hit the ESC key.
- A Confirm Update alert box is displayed to confirm the number of items that you are updating. Select Yes or hit the Enter key to confirm changes. Select No or hit the ESC key to revert the changes.
- Repeat steps 2 to 7 as required.
Deleting a Boundary
- Select the boundaries you want to delete.
- Click the Delete button ( ) on the Action Bar or press the Delete key on your keyboard. You will see a prompt asking you to confirm the action.
- Click Yes to delete the selected boundary.