Use this article to learn how to create a catalog item in the Catalog module. Creating a catalog item is essential because it serves as a template from which specific xyicons are generated.
Before you begin
- Make sure that your Xyicon User has the necessary permissions to create catalog items. User permissions are managed by your organization's Xyicon Administrator.
- Ensure you set up the following module settings for the Catalog module under Xyicon Settings ( ): Catalog Types, Catalog Fields, Catalog Layouts, and Navigation.
- Have your custom
*.glband *.gltf files ready if you are looking to upload your own models.
Step 1 - Enter Catalog Item Properties
- Navigate to the Catalog module from the Main Menu ( ).
- Click the Create Catalog Item button ( ) on the Action Bar. The Create Catalog Item wizard will open.
- Click the Type field and select the catalog type for which you want to create a new catalog item.
- Next, specify the model of the new catalog item. The value you enter must be unique across all catalog types.
- Optionally, enter values for the rest of the fields appear.TIP: These additional fields are the fields that are assigned to the selected catalog type. If you do not see any fields for the selected type, check whether any fields are assigned to the catalog type and added to the module's layout under the Catalog module in Settings ( ).
- Click Step 2 ( ) or the Next button to select a model for the new catalog item.
.png)
Step 2 - Select the Model for your Catalog Item
The model you select determines if the xyicons created from this catalog item will show up as standard xyicons or model xyicons.
Option 1 - Select Model for Standard Xyicon
- Select the default tile located at the top of the list if you want the new catalog item to produce xyicons that show up as standard xyicons.
- Click Step 3 ( ) or the Next button to customize the model.
Option 2 - Select Model for Model Xyicon
- Select a custom 3D model if you want the catalog item to produce xyicons that show up as model xyicons.
- If a suitable model is unavailable, click the Upload button ( ) on the panel to upload your own model. The Open dialog will appear.
- In the dialog, navigate to the location on your computer where your
*.glbor *.gltf files are stored, select the file you want to upload, and click Open. - On the popup that appears, the file name will automatically appear in the Add Keywords dialog box. You may add, edit, and delete keywords here. You can use these keywords to search for the model on this panel when creating future catalog items. A catalog model will not be saved without this step.
- Select the uploaded model.
- Click Step 3 ( ) or the Next button to customize the selected model.
Step 3 - Customize the Selected Model
The available properties for customization in this step will differ based on whether you selected a default tile (standard xyicon) or a custom 3D model (model xyicon) in the previous step.
Option 1 - Customizing a Standard Xyicon
The default tile (standard xyicon) can be customized using images, colors, and text. You can choose from the standard images that come preloaded in Xyicon, or you can upload your own images using files from your computer or Google Search.
Select a Standard Image
- Click the Standard Images button and select an appropriate image from the available list.TIP: Use the Search field to filter the list of standard images in the list.
- Next, based on your requirement:
- Click Step 4 ( ) or the Next button to set up a port template.
Select a Custom Image
- Click the Custom Images button and select an appropriate image from the available list (if any).TIP: Use the Search field to filter the list of custom images in the list.
- To upload your custom images.
- Click the Upload button ( ) and upload an image file from your computer.
- Click the Google Search button ( ), search for the image you want, hover over the image you want to use and click Add to Library.
- On the popup that appears, the file name will automatically appear in the Add Keywords dialog box. You may add, edit, and delete keywords here. You can use these keywords to search for the model on this panel when creating future catalog items. A catalog image will not be saved without this step.
- Next, based on your requirement, apply one of the modifications below to the selected image.
- Click Step 4 ( ) or the Next button to set up a port template.
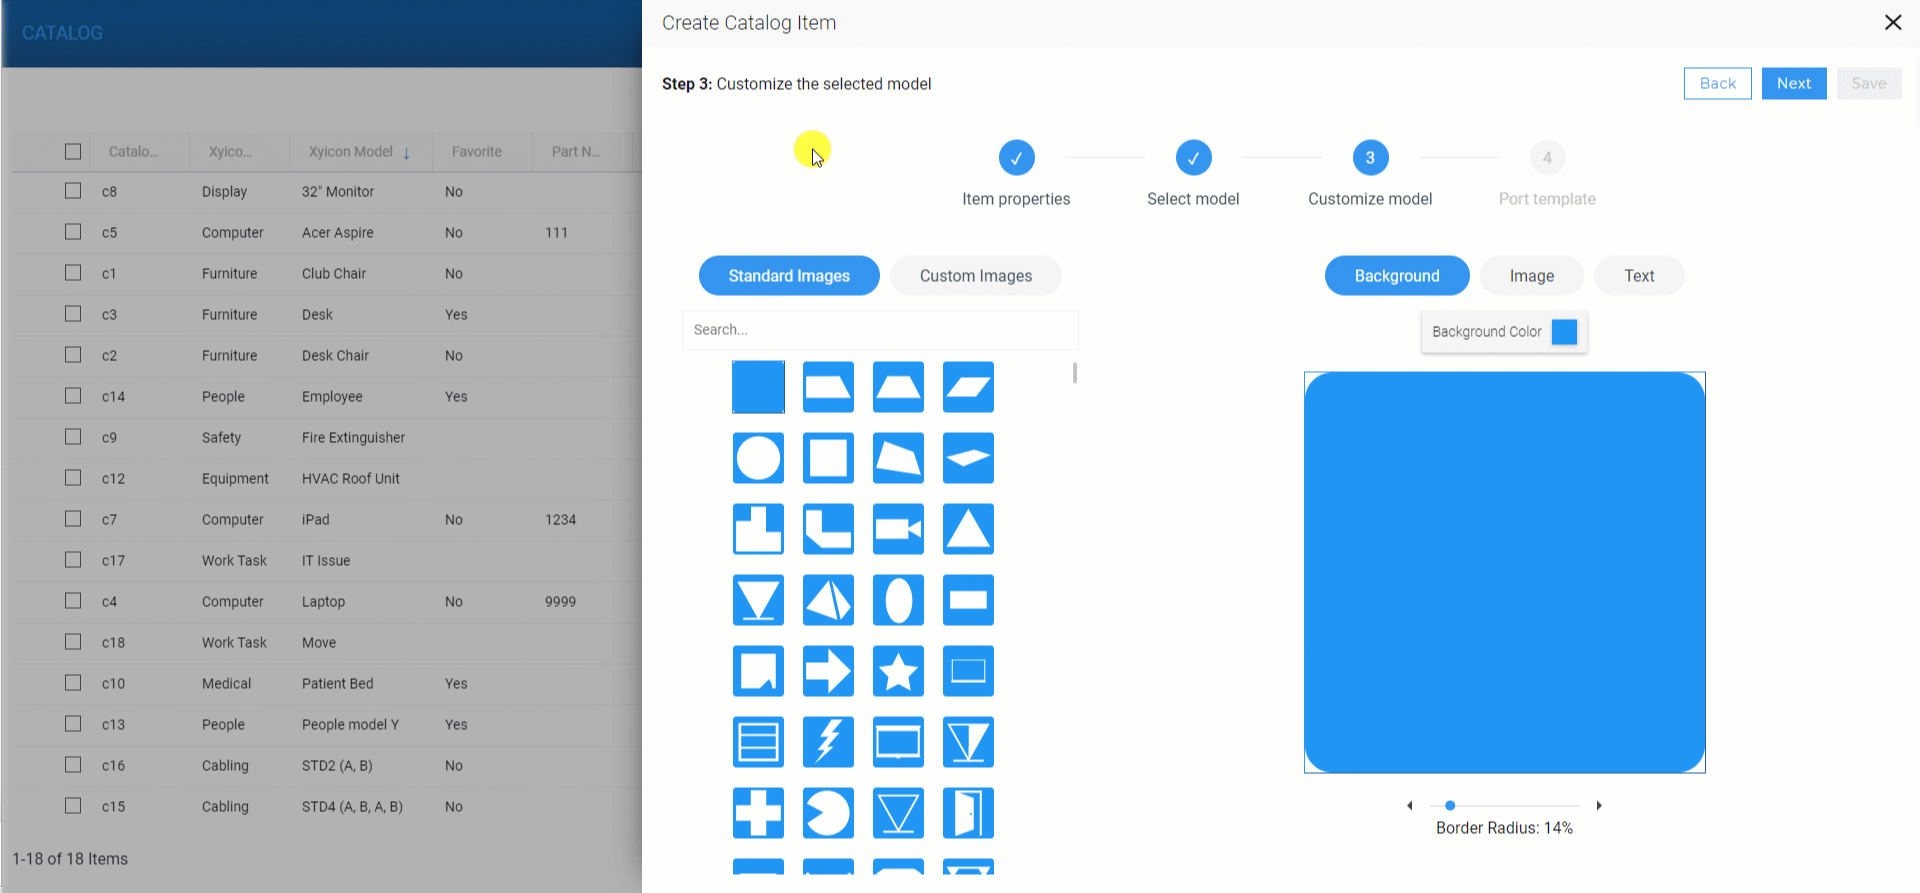
Change Background Color and Radius
The color you assign to the Catalog Type in the Catalog settings module serves as the default background color for catalog items created with that type. You can easily change it to your preferred color and customize the background using these steps.
- Click the Background button and then the Background Color button ( ).
- Next, select a color using the Basic or Advanced tabs.
- Finally, adjust the radius of the background using the Border Radius slider.
Adjust the Image
- Click the Image button.
- Select the actual image. The selected image will have a blue rectangle around it.
- Use the options below to adjust the selected standard or custom image.
- Color ( ) - Change the color of the image.NOTE: Changing color applies to standard images only.
- Rotate ( ) - Rotate the image. The rotate icon is located on the blue rectangle around the image.
- Move - Move the image.
- Scale - Use the slider to scale the image.
- Delete ( ) - Delete the image from the preview.
- Flip Vertically ( ) - Flip the image vertically.
- Flip Horizontally ( ) - Flip the image horizontally.
- Color ( ) - Change the color of the image.
Add Text to the Image
- Click the Text button and start typing in the textbox.
- Use the available Formatting Bar to apply text formatting and align the text.
- You can also rotate and move the textbox on the image.
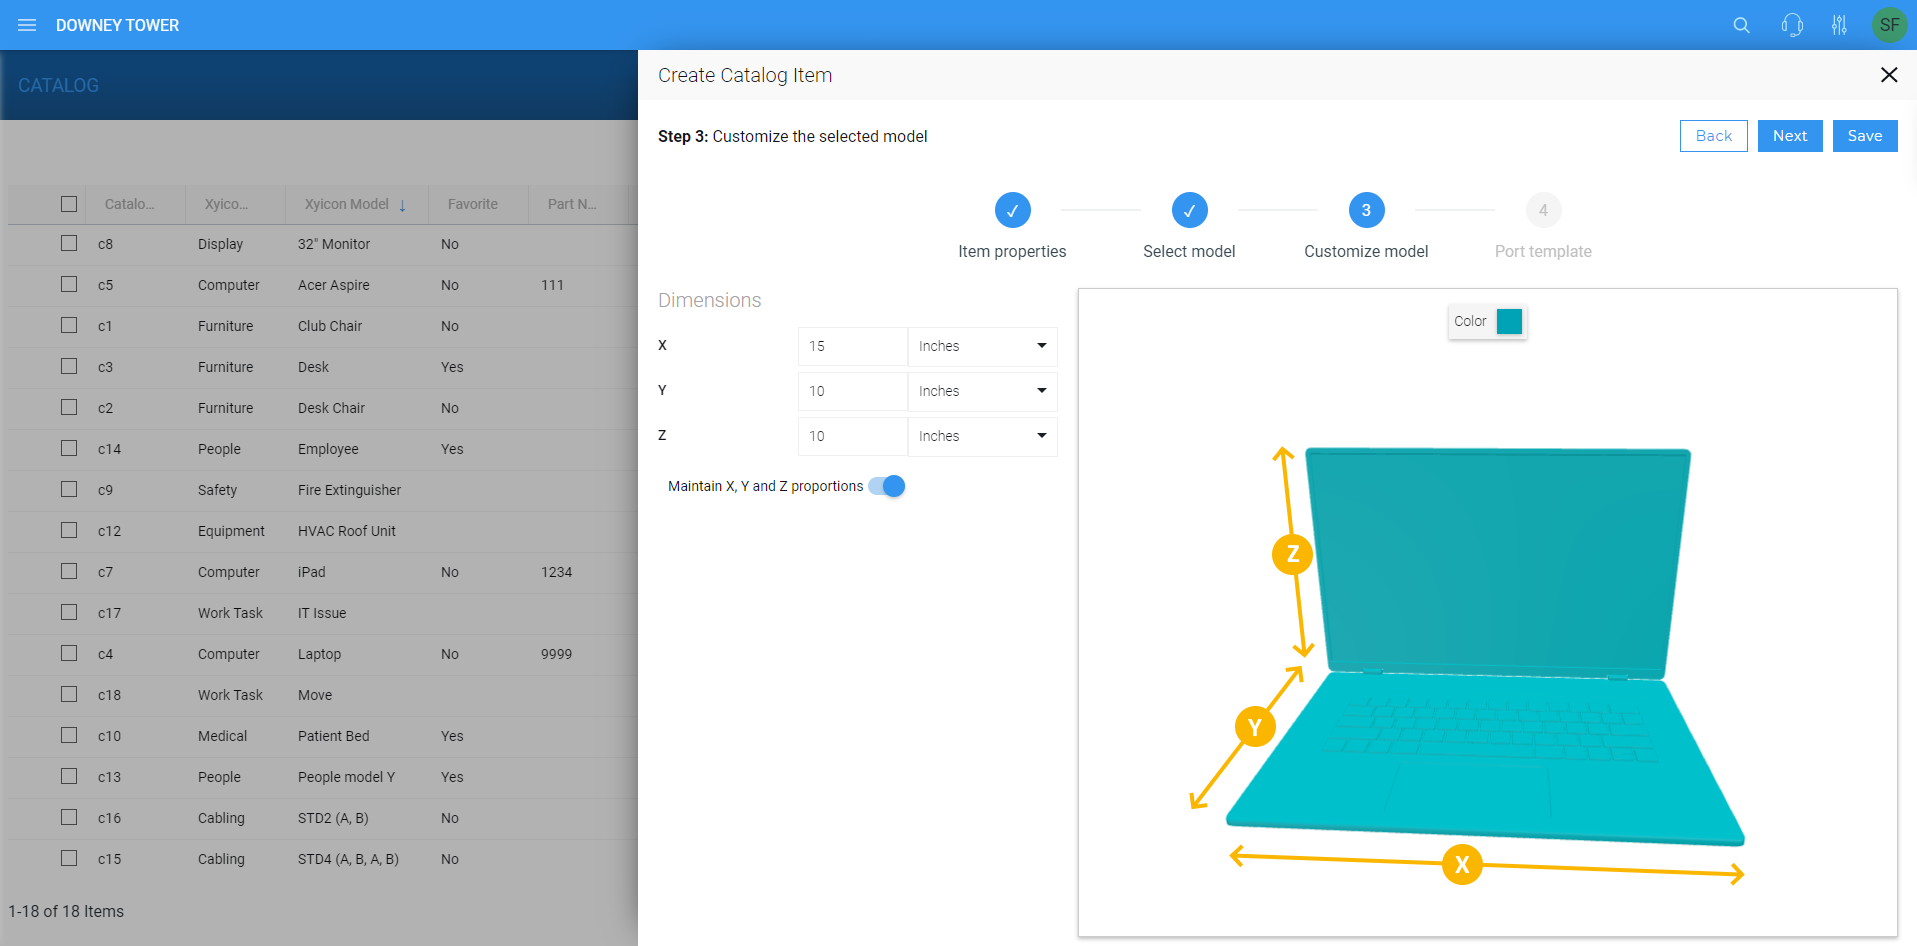
Option 2 - Customizing a Model Xyicon
The dimensions of a *.glb or *.gltf file-based model are measured using X, Y, and Z coordinates.
- On the Customize Model step of the Create Catalog Item wizard, enter values for the X, Y, Z fields and select the appropriate unit of measure for each coordinate using the dropdown field next to it.
- Next, switch on the Maintain X, Y, and Z proportions toggle if you want Xyicon to automatically calculate all measurements when you change the value of a single coordinate.
- To change the color of the model, click the Color ( ) button above the preview and select a color from the Color Palette. TIP: Click the preview of the selected model and rotate the object to see all aspects of it.
- Click Next or Step 4 ( ) to set up a port template optionally.
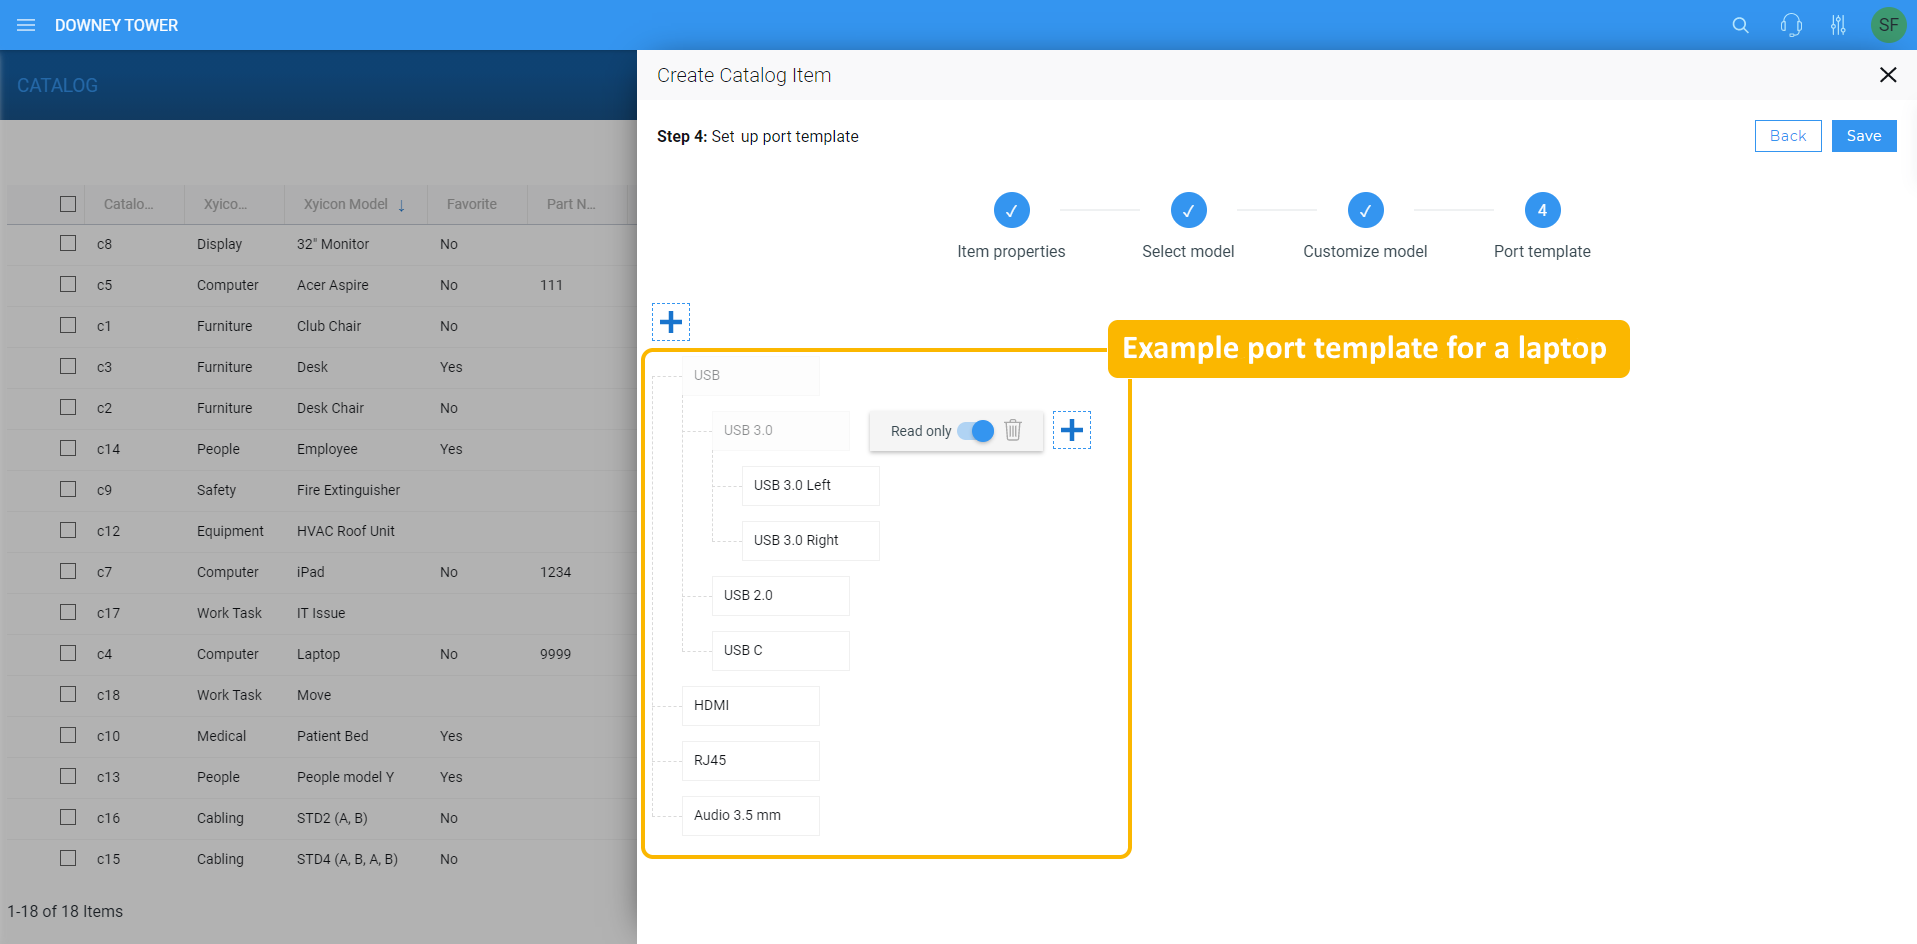
Step 4 (Optional) - Set Up Port Template
As the name suggests, a port template allows you to build a template of ports that, in turn, will be inherited by the respective xyicons as ports. The template can be a single port or a structure consisting of several levels. Ports allow you to create detailed relationships between xyicons.
- Click the Add Port Template button ( ) on the panel and optionally enter a name to identify the port.
- Repeat the above step as needed.
- To create a port structure, click the Add Port Template button ( ) next to a port you entered previously and optionally enter a name to identify it.
- To make a port read-only, turn on the Read only toggle. This ensures that no one can change the port name.
- Once you have completed setting up the port template, create the catalog item.
Step 5 - Create the Catalog Item
Click Save to complete creating your new catalog item. You can view your new catalog item in the Catalog module and the Catalog Panel of the Space Editor.