Use this article to learn how to replace the existing background file of your space with a new file version. If you want to create a space using a new background file, read the Creating a New Space article.
Before you begin
- Make sure you have set up the following module settings for the Space module under Settings ( ): Space Types, Space Fields, and Space Layouts.
- Make sure that your Xyicon User has the necessary permissions to create and replace a space. User permissions are managed by your organization's Xyicon Administrator.
Step 1 - Select a Version Set
- Navigate to the SPACES module.
- Click the Create Space button ( ) on the Action Bar.
- Select a version set from the available versions in the Create New Space panel.NOTE: If there are no version sets available, you can create a new version set.
- Click Next to upload a background file.
Step 2 - Upload PDF (Upload Background File)
A background file is a two-dimensional graphical representation of a space, such as a floor plan, site map, image, drawing, illustration, or sketch. The background file serves as the backdrop on which you build your space (including object placement such as boundaries and xyicons). The file must be in *.pdf format.
- On the Create New Space, Upload PDF panel, select the type of space you are uploading in the Space Type field.
- Click on the Upload File box ( ) and add the *.pdf file you want. Alternatively, you can drag and drop your *.pdf file into the Upload File box as well.
- To create multiple spaces at once, use one of the following methods when adding files to the Upload File box ( )
- Select a multi-page PDF file; Xyicon will separate them into individual background files.
- Select multiple PDF files.
- Click Next to review your space names.
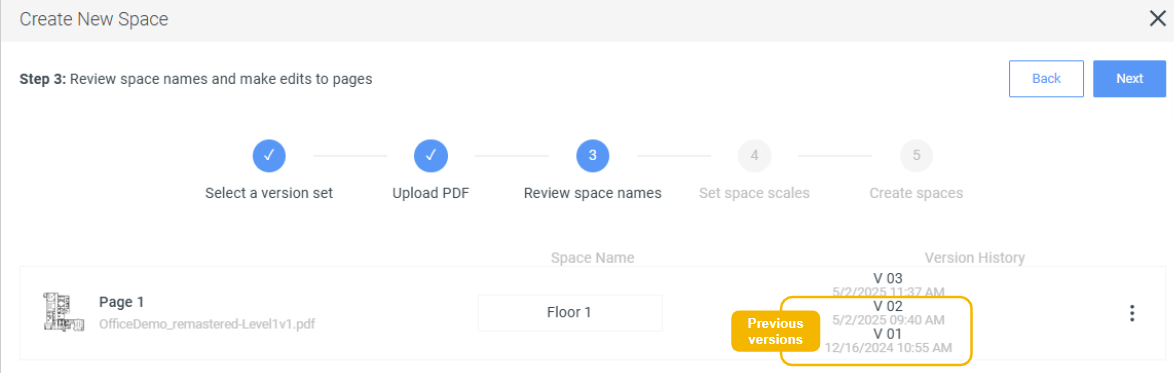
Step 3 - Review Space Names
- On the Create New Space, Review Space Names panel, locate the Space Name field. Make sure the name displayed in the field is identical to the name of the space you are updating with the new background file version.
If you upload multiple pages or multiple background files, make sure that the names displayed in the fields are identical to the names of the spaces you are updating with the new background files.IMPORTANT: If you enter a unique name, Xyicon will create a completely new space object and NOT a new version.NOTE: If there is a new floor in the PDF file that you upload, it will be created as a new space. - Check that the correct list of versions is displayed in the Version History field. All previous versions will be displayed when adding a new version of a space.
- To rotate your background, click on the Options button ( ), and click Rotate 90° CW (clockwise) or Rotate 90° CCW (counter-clockwise).
- To delete a background file, click on the Options button ( ) and click Delete.
- Click Next to confirm the alignment of the new space version.
Step 4 - Confirm Alignment (Set Space Scales)
The scale of your space plays a critical role in how xyicons and boundaries are displayed, how they will plot, and what the model of your space will look like in the Space Editor.
When you upload a new version of the file, ensure that the new background aligns perfectly with the old background. This alignment is essential to prevent any scale discrepancies between the two backgrounds.
The new background is shown in green and the old background in red.
- On the Create New Space, Set space scales panel, zoom in to your background file using the scroll wheel of your mouse (scroll up to zoom in and down to zoom out).
- The Space Scales Toolbar will appear on the left corner of the uploaded space, along with the Alignment Toolbar on the right corner.
- The Space Scales Toolbar contains three tools:
- Pan Tool: Move around the space.
- Move Background: Adjust the old and new backgrounds.
- Set Pin: Pin a corner of the background and adjust it using the Alignment Toolbar.
- The Space Scales Toolbar contains three tools:
- To align the old and new backgrounds, you can:
- Pin a corner using the Set Pin tool and adjust the scale of the background using the alignment tool in the top-right corner. The position of the pin affects the direction of the scaling. For example, if you pin the center, the scaling will apply in all directions.
- Reposition the background using the Move Background tool to align boundaries and xyicons accurately.
- Adjust the scale by dragging the handle or using the left and right arrows on the Scale Bar on the Alignment Toolbar.
- After completing your adjustments, click Confirm Alignment to save the changes.
- Click Next to create your spaces.
Step 5 - Update the Space (Create Spaces)
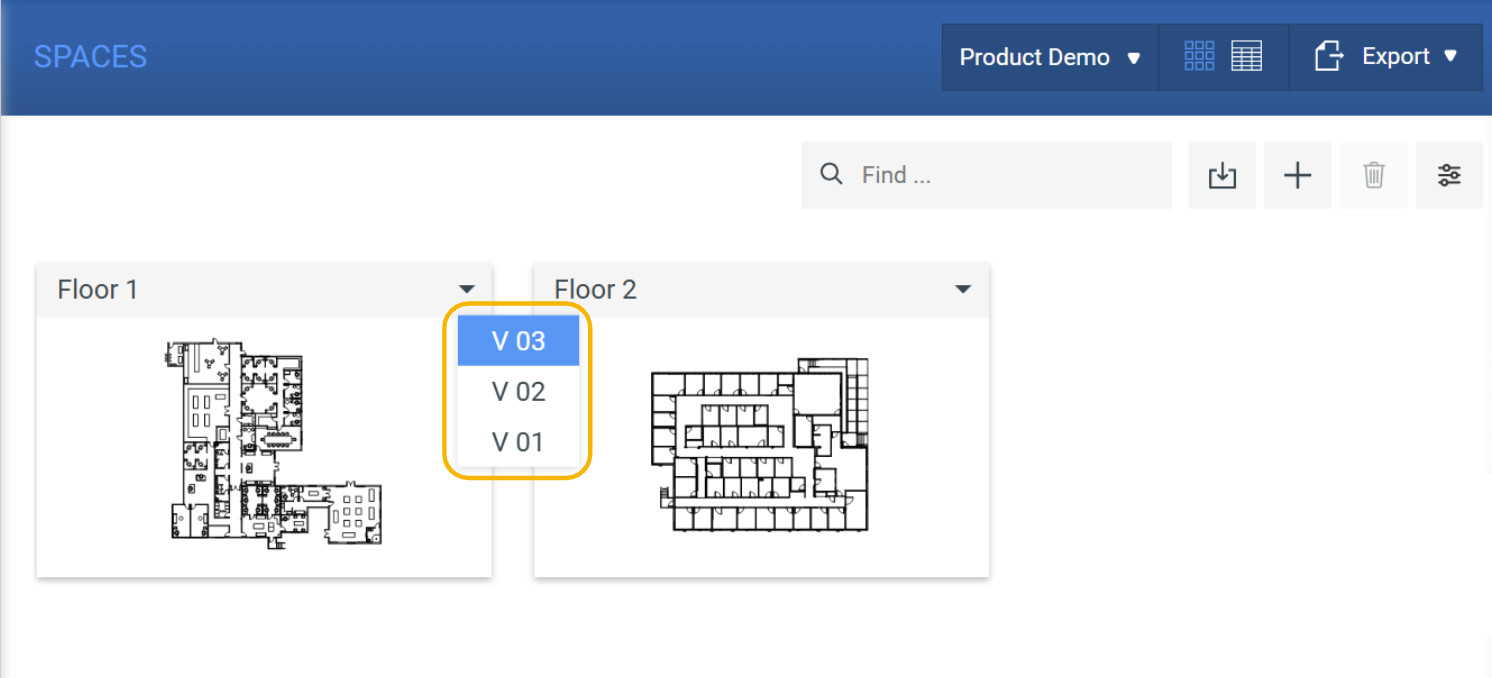
You are now ready to update your space with the latest background file version. Click Create (this activity may take a few minutes based on the number of background files you have uploaded). Once the process is complete, you can view your updated spaces in the SPACES module. You can access the new version by clicking the drop-down arrow ( ) on the space tile.